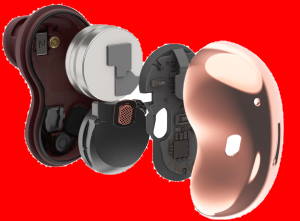
This Galaxy Buds Live guide explains the layout of Galaxy Buds Live, the function of each part, and how to use each part properly.
As the layout of Galaxy Buds Live is substantially different from that of Galaxy Buds and Galaxy Buds+, this guide applies to Galaxy Buds Live only. For the layout of Galaxy Buds and Galaxy Buds+, please check this guide.
Why do you need to know the layout of Galaxy Buds Live?
While Galaxy Buds Live is simple to connect and use, it is a bit difficult to control it. For example, you may accidentally reject a call if you are not familiar with the location of the touch area.
It is also important to regularly check and clean the speaker vent and air duct of the buds so that Galaxy Buds Live always in the optimal state.
You should know the location of the microphones and antenna to avoid some possible interferences.
Anyway, it is worth spending a few minutes on getting to know the layout of Galaxy Buds Live if you want to get the optimal performance of the buds.
Inside layout of Galaxy Buds Live
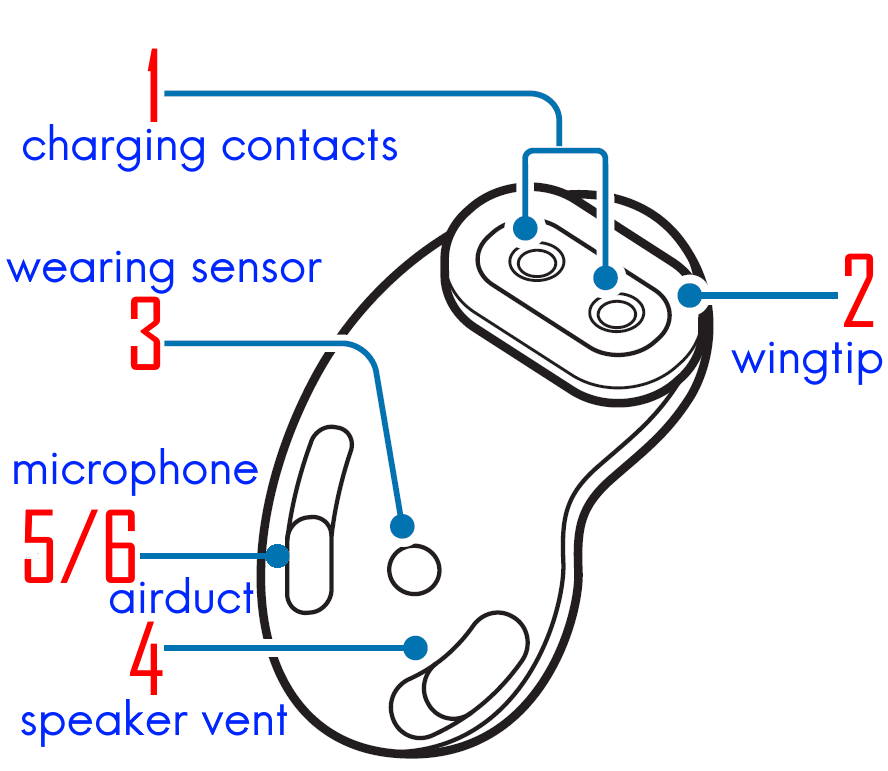
On the inside layout of Galaxy Buds Live, you can find the following 6 parts, as illustrated in the picture below:
- Charging contacts.
- Wingtip.
- Wearing sensor.
- Speaker (vent).
- Microphone (inside).
- Airduct (inside).
We now explore them one by one.
1. Charging contacts
The two charging contacts are used to charge the buds when you put them on the charging case.
To charge the buds, you need to position the buds properly in the case so that the two contacts connect to the corresponding contact points inside the charging case.
As explained in this guide, you must close the charging case if you want to charge the buds. You can follow this guide to check the battery level of Galaxy Buds Live.
If you mess up left and right buds in the case, the charging contacts will not match the contacts in the charging case. And therefore, the buds will not be charged although you close the case.
2. Wingtip
Many Galaxy Buds Live owners haven't realized the existence of the wingtip. They are very small! But they do work as expected.
When you get the Galaxy Buds Live, the middle-size (M) wingtips were pre-installed. Inside the box, you can find two other sets of wingtips (small/S and large/L). So do not throw away the box until you take out the spare wingtips.
The purpose of the wingtip is to let the buds seat in your ear (to prevent the buds from moving around). So, if you feel Galaxy Buds Live is too “loose”, you can try the L wingtips. Similarly, if you feel it is too tight, you may try the small.
3. Touch (wearing) sensor
Galaxy Buds Live knows whether the buds are in your ears or not, with the help of this touch sensor.
If Galaxy Buds Live often cut off music for no obvious reasons, very likely, the touch sensor is dirty. You may learn it with a soft cloth.
4. Speaker (vent)
The sound comes out from the speaker vent. So, you should clean it regularly with a soft brush (to remove er wax) to get high-quality sound.
5. Inner microphone (voice pickup unit)
In addition to the 2 microphones facing outside, there is one inside-facing microphone.
The inner microphone actually has several functions, for example:
- It can monitor the actual sound and noise inside your ear canal. So, the buds can detect whether you wear them properly. ANC (active noise cancelling) unit can also potentially use this microphone to get better noise cancelling.
- It is part of the voice pickup unit (VPU) of Galaxy Buds Live.
6. Air duct (bass duct)
The air duct on Galaxy Buds Live can help to adjust the pressure inside the ear canal so that you will not feel the pain even if you wear them for an extended period.
The air duct is also part of the bass duct, which can help amplify the bass notes.
You should clean the air duct regularly with a soft brush or cloth to keep the buds in the optimal state.
The outside layout of Galaxy Buds Live
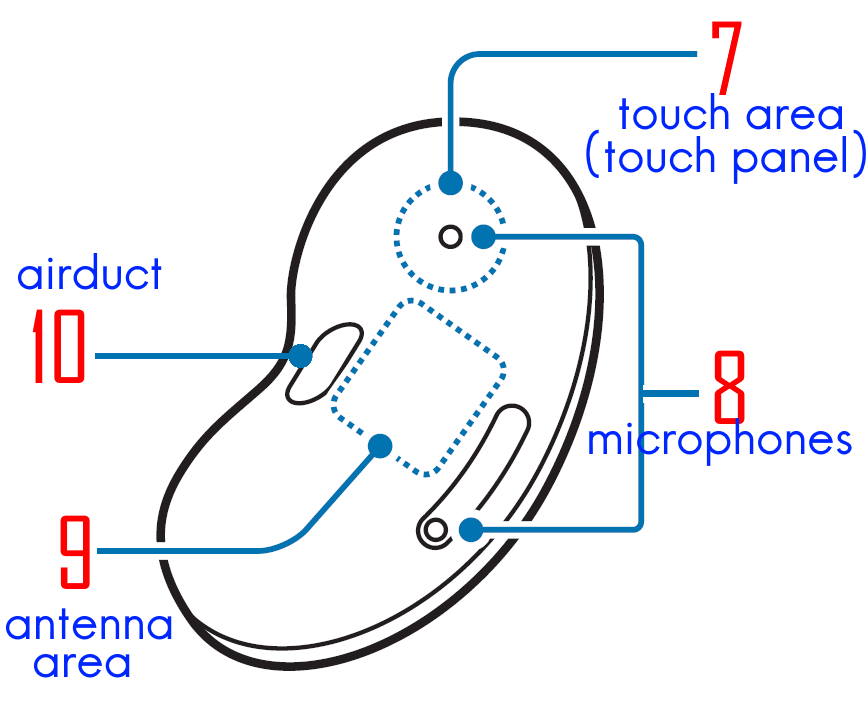
On the inside layout of Galaxy Buds Live, you can find the following 4 parts, as illustrated in the picture below:
- Touch area (touch panel).
- Microphones (outside).
- Antenna area.
- Airduct (outside).
Now, let's explore the outside layout of Galaxy Buds Live.
7. Touch area (touch panel)
You can use the touch area (touch panel) to control Galaxy Buds Live. Due to the size of the buds, the responsive area is relatively small.
The touch panel allows you to use gestures to pause, resume, skip media playing, or pick up a phone call. You can also use the touch panel to adjust the volume or switch noise-cancelling modes. You need to use the Galaxy Wearable app to customize the touch gestures for Galaxy Buds Live.
Please read this guide on how to use gestures on the touch panel to control Galaxy Buds Live.
You may also disable the touch sensor (block touches) in the Galaxy Wearable app or with the Galaxy Buds Live widget.
If you were an AirPods Pro user, you need to know the touch panel does not need to “press” as the Force Sensor on AirPods Pro.
8. Microphones
The dual microphones help Galaxy Buds Live:
- Sample ambient noises for the ANC unit.
- Pick up voices and sounds.
9. Antenna area
Galaxy Buds Live use Bluetooth to connect to your phone or other devices. So, you should avoid holding the antenna area.
10. Air duct
As mentioned earlier, the air duct can help adjust the pressure in the ear canal and amplify the bass notes.
Do you have any questions on the layout of Galaxy Buds Live?
If you have any questions or need help on the layout of Galaxy Buds Live, you may let us know in the comment box below.
The community will help you.
You may check Headphone 101 for detailed explanations of headphone technologies and terms.
For Bluetooth headphone guides, please check the Bluetooth headphones section.
The sports headphones section is dedicated to guides on sports headphones.
Active noise-cancelling headphone guides can be found in the Noise-canceling headphones section.
You may also reach us through:
- Contact us page.
- Facebook page.
Enjoy your Galaxy Buds Live!


Leave a Reply